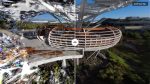
With the use of VIZ Render and a few extra minutes of work on your Architectural Desktop model, anyone can produce a fairly good rendered image says CADline’s Technical Services Manager, Justin Taylor.
Visualisation, the creation of photorealistic images and animations, is often seen as a ‘Dark Art’ and those individuals that create them the ‘High Priests’ of the CAD world.
This is true to a certain extent, as creating really high quality photo realistic images requires an in-depth knowledge of various parameters such as a material’s ‘Index of Refraction’ or its ‘Luminance cd/m2’, or whether a scene requires the radiosity calculation to ‘Regather the Indirect Illumination’ etc. This is not something that every CAD user needs to know, wishes to know or indeed has time to learn and it’s often the case that a practice either has a couple of people trained up in the use of high-end visualisation packages, or that they outsource their requirement to a 3rd party bureau.
Often, whilst a project is being developed, certain visuals are required for presentations, reviewing etc. These visuals generally do not need to be the absolute pinnacle of photo realism and are required fairly quickly.
Now without upsetting any of the visualisation gods out there, their time is best spent producing the very high end work and anyway, they are often too busy to knock up a quick low end perspective render for every user requiring one.
This is where VIZ Render comes in. Autodesk has integrated an advanced visualisation tool derived from VIZ 2006 with ADT, and the product has been optimised and streamlined for use by architects. The results that can be achieved with a few extra minutes work on top of the ADT model can be very good and often meet the immediate requirement, without the necessity of waiting for the practice’s visualisation guru or the bureau to get back to you.
So the question is: How easy is it to create a fairly decent rendered image and how long will it take?
Working with VIZ Render
Well let’s start by looking at the ADT model. Within ADT it is possible to have all the design objects pre-set with materials i.e. windows will have a frame made from either wood or metal etc and the glass from, well glass obviously (although this could be coloured, tinted, mirrored etc.)
So when a practice sets up its Object Catalogue with the main design components, these render materials will automatically be applied as the model is created. Therefore little or no additional time is required to do this within VIZ Render. (It is possible to create and apply materials within VIZ Render.)
Within ADT click on the Open drawing menu arrow at the bottom left of the screen and choose Link to VIZ Render. This will open VIZ Render and create an active link with the original model in ADT. Any changes made to the model in ADT can be immediately updated in VIZ Render by reloading the link.
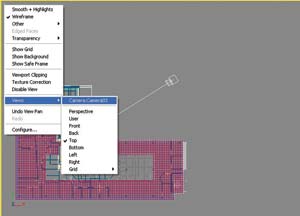
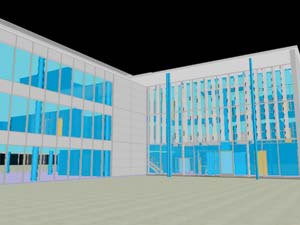
VIZ Render can utilise any cameras that have been placed within ADT. To do this ‘right mouse click’ on the viewport name (top right) and select Views > Camera. Then repeat, this time selecting the Smooth + Highlights option. This will display a shaded perspective view of your model. See Figures 1a and 1b. Without carrying out any additional work, click on the render icon (the little teapot button) on the render toolbar. This will render the viewport as the model currently stands.
The resulting image, as seen in Figure 2, is pretty poor. The scene looks flat with no real lighting, shadows, reflections, sky etc. The materials from ADT have come across however.
So how can we improve this image simply and quickly? Firstly let’s add a background. Select Environment from the Rendering pulldown menu. This opens the Render Scene dialogue box. Under the Environment tab within the Background parameters, click on the Environment Maps button (set to none initially). This will allow you to browse and select an image to use as a background.
Next, to give the finished scene a sense of true lighting, depth and shadows etc. place a Daylight System. Set the viewport to top down view and select Daylight system from the Create pulldown menu. Click and Drag to place the compass and set the orientation of the sun.
The Daylight system is designed to follow the geographical angle and movement of the sun over the earth at a given location. You can set the location, date, time and compass orientation from the modification palette. These features can also be animated allowing sun studies etc. Switch back to the camera perspective view and render the scene again.
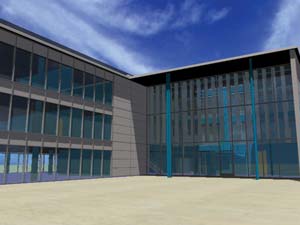
The resulting image, as seen in Figure 3, will now have a background and the model will be illuminated with a true representation of the sunlight casting shadows. This is already a much improved image, but the lighting is still not quite correct. In the real world that we live in, light bounces back from surfaces, bleeding colour, and is reflected and refracted by shiny materials etc. This is where your practice’s visualisation guru will spend much of his/her time tweaking the renders settings to improve the final results. However the idea of VIZ Render is that the average ADT user can produce good results without this time consuming and complex process.
Select Render from the Rendering pulldown menu. This will open the full Render dialogue box. In the Render Options at the bottom of the dialogue box, select High-Exterior from the Preset options and click the Load button in the Select Preset Categories dialogue box. Now render the scene once more.
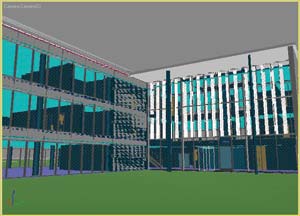
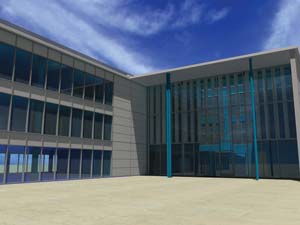
This time the resulting render will take longer to produce as VIZ Render is now calculating the light in a true sense and bouncing it back from all the surfaces etc. This gives the scene a much more polished and accurate look e.g. the shadows are not pitch black and the undersides of the eaves are illuminated etc. See Figure 4.
Conclusion
So with the use of VIZ Render and a few extra minutes work on the ADT model, anyone can produce a fairly good rendered image. If better results are required, then the .RTF file that VIZ Render produces can be opened in either full VIZ or MAX and further developed.