The way we see our world is thanks to the way light is absorbed and/or reflected by the objects around us. In Revit and 3ds Max this can be re-created by raytracing and radiosity rendering.
When recreating photo-realistic images from virtual, modelled environments the concept of applying a texture or material to an object in order to represent the finish is generally understood, but the properties of absorption and reflection also need to be considered, and two pieces of jargon often banded around are Raytracing and Radiosity.
Raytracing is a common rendering algorithm used by software packages including Accurender, a cut down version of which powers the rendering of images from within Revit. Ray Tracing is a global illumination based rendering method; it traces rays of light projected from the eye through the image plane into the model scene. The rays are tested against all the objects in the scene to determine if they intersect any other objects. If the ray does intersect with an object, the pixel is then set to the colour values returned by the ray. If the ray misses all objects, then that pixel is shaded the background colour. This technique handles shadows, multiple specula reflections, texture mapping, reflective surfaces, and transparent or opaque materials. However there are limitations to this technique when it is used in isolation.
{mospagebreak}
Radiosity is a method of illumination which takes into account distribution of energy via reflection and absorption of light. The first pass will identify the sources of light within a scene. After the first pass each surface is treated as a light source whose intensity is defined by the energy distributed from the first pass sources, minus the effect of the surface finish. The process is repeated until the residual energy falls below a certain tolerance and the lower this tolerance is set, the higher the level of realism achieved. High-end visualisation packages such as Viz and 3D Max are able to ÙbounceÝ light until the eye cannot distinguish the result from a photograph.
In rendering packages such as that within Revit, raytracing may be performed on its own but will be significantly enhanced by the use of radiosity, with a couple of provisos:
- Radiosity is only used for internal scenes, this is because light needs surfaces to bounce from; using an external scene will cause the light to bounce around infinity, causing unrealistic illumination and also very high white spots in places.
- Radiosity is not very good when used in animation as it requires exposure controls which can cause flickering in a movie. Accurender appears to suffer quite badly from this phenomenon, whereas Max and Viz have got some exposures that are more suited to animation.
If the situation suits the use of radiosity then this should be carried out first and the resulting light model is used to influence the results of the raytracing and provide more realistic shadows.
For exampleÍ
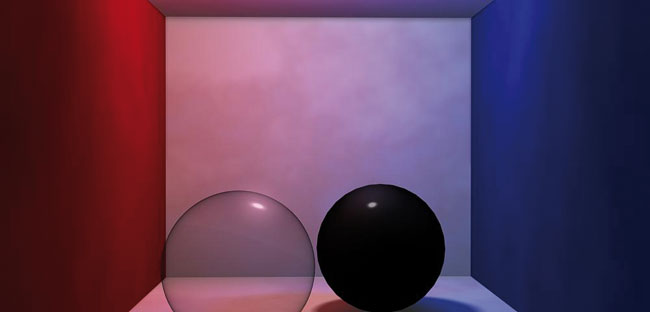
To further understand the process, consider the simple example of a shiny red ball sitting on a white surface. Light striking the ball casts a shadow which is obvious enough, but a certain quantity of light energy is reflected by the ball which then acts as a secondary emitter, sending an amount of red tinted light to the surrounding surface. The result is to give the otherwise white surface a reddish hue within the immediate vicinity of the ball. This effect is often referred to as Ùcolour bleedingÝ and subtle as it is, we are accustomed to the result in the real world; hence radiosity helps to create the illusion of realism within computer renderings.
The radiosity process produces a 3D light model of the scene with basic colour and absorption/reflection properties assigned to geometry. The light model is then used to enhance the image produced during the raytrace procedure.
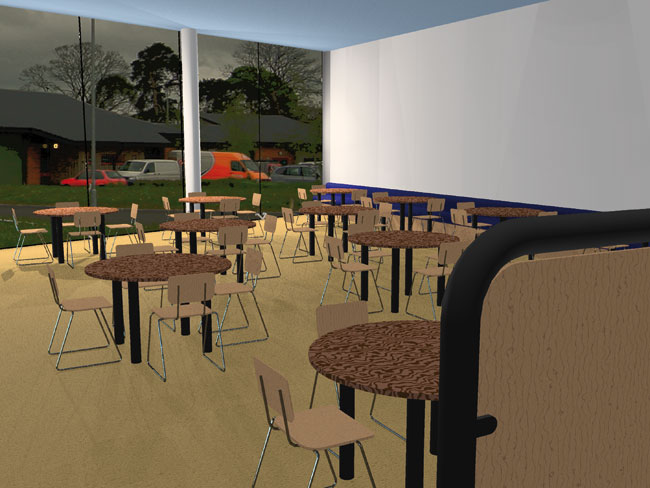
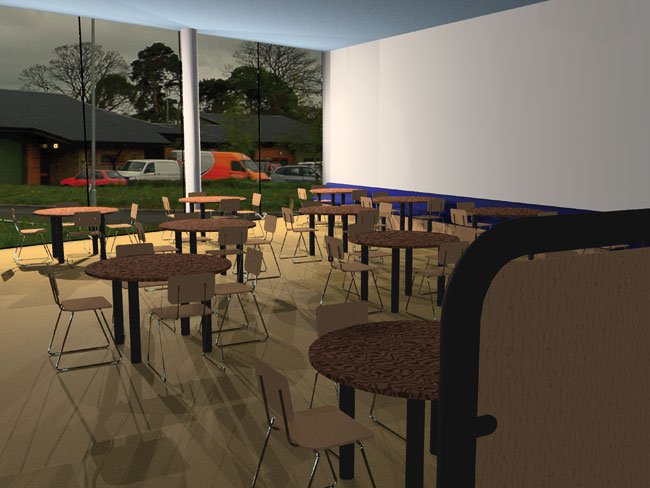
The next two images show how radiosity calculations applied in conjunction with raytracing produce images with more subtle and accurate lighting than those rendered with raytracing alone.
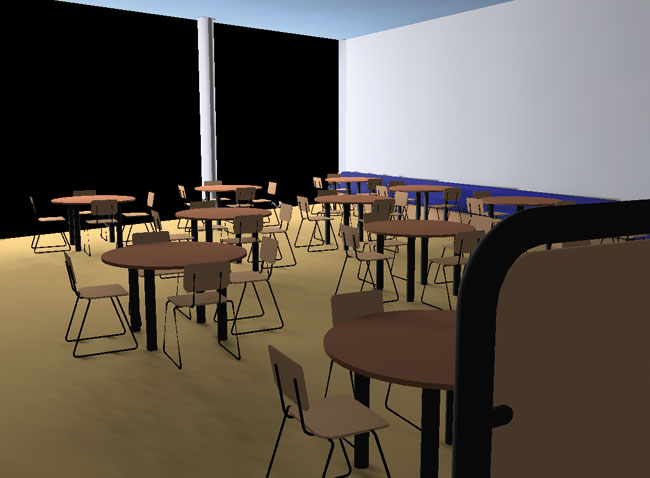
In Figure 1, an image produced using raytracing alone, light is emitted and intersects with the objects in the scene lighting them and casting shadows beyond, but due to the way that the light rays are tested and returned, the scene appears unnaturally dark as objects are only lit by rays coming directly from the primary light source. Similarly shadows are only created where rays do not hit an objects surface.
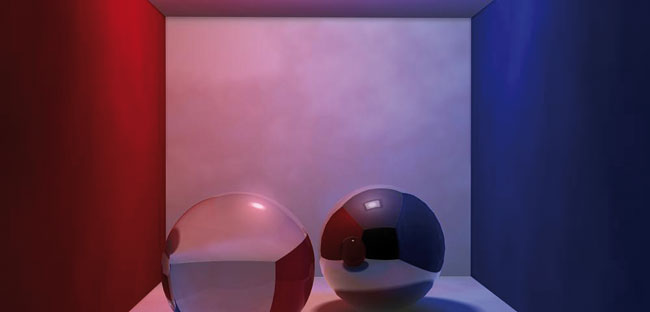
In Figure 2 when radiosity is used in conjunction with raytracing to calculate the scene lighting the results are much more realistic. Light is reflected back from the surfaces and bounced – or to put it in more technical terms, re-gathered – around the scene, whilst ÙbleedingÝ colour from the objects as it goes. Shadows also appear more subdued as light is reflected from surfaces behind objects where before, no direct light fell. In Figure 3 you can see the effect of using Radiosity on its own without raytracing.
Revit uses a highly simplified version of the Accurender rendering engine and the interface has been designed with architects in mind, so unlike specialist rendering products on the market, users need not be visualisation gurus with pony-tails; it is easy to use and still produces good results, albeit not in the same league as more advanced applications. With almost no user intervention, the engine calculates indirect light, hard / soft shadows, colour bleeding, blurry / sharp reflections, translucency, transparency, depth of field, attenuation and reflections.
{mospagebreak}
The down side
Using Radiosity does require additional processing time for still images, although for animation, the same light model applies for the entire scene so a new Radiosity calculation is not required for each frame. Also, as it creates a static, 3D light model, any alteration or movement of objects within the scene make the light model obsolete and the Radiosity solution must be re-calculated.
There are some other issues for consideration associated with using a radiosity solution besides the render time; anomalies within an image are often referred to as artefacts.
One of the most common types of artefact is Light Leakage which is due to light seeping between surfaces. Imagine a fish tank whose glass sheets butt up to one another without any sealant; water would seep between the joints.
Advanced options
The results of the radiosity calculation can also be used to analyse the designed lighting of your building.
Revit allows for accurate lighting data from the manufacturers to be attributed to a Revit light fitting to replicate the illumination provided by certain designs. For example, the Erco web site allows you to download IES data files for every light fitting in their catalogue. The IES file contains all the photometric data for a particular light fitting such as the hotspot angle, falloff, etc. and when a lighting fixture family is directed towards the file it applies this information to the light model.
Conclusion
So as well as being one of – if not the – most powerful design package for the building design industry, Revit allows the user to generate photo-realistic images of the concept with accurate lighting. The most important factor in this however, is that the rendered images produced are a by-product of having developed your design and hence produced your plans, elevations and schedules etc. Many Architects that adopt Revit are so used to having to outsource the production of presentation graphics that they overlook a very accessible and useful aspect of Revit, assuming it to be overly complicated. What this article attempts is to explain some of the concepts of rendering, but also to encourage users to have-a-go. A full-colour well-lit scene can speak volumes to a client.
That said of course Revit-produced images will not compete with the quality achievable in advanced visualisation packages such as 3ds Max, and for the really important images, it is still relevant to incorporate such requirements in your plans, but at least the Revit model can be imported into Max without having to re-model. The Radiosity calculation from Revit can also be saved as an external file, and then re-used within Max to save re-calculating the scene (although, if any materials are edited, or objects moved within Max, then the scene should be re-processed to reflect the changes made).
Revit really is a one-stop design tool for architects and designers, offering the ability to not only design buildings quickly and accurately, but also to show the concept off to its best advantage with still images, walkthroughs and panoramic vista with little additional effort or skill required!