Greg Corke gets hands-on with three Virtual Reality (VR) applications that work seamlessly with Autodesk Revit, weighing up their capabilities and assessing how well they combine with the HTC Vive and workstation GPUs
Virtual Reality (VR) is one of the most exciting technologies to hit the AEC market in years. Architects, engineers and clients alike can experience a realistic virtual prototype of a building long before it is built.
A fully immersive VR experience gives you a sense of scale, depth and spatial awareness that simply cannot be matched by a rendering, walkthrough or physicalscale model. The feeling of presence – of existing inside the 3D model – is quite incredible. Users have the freedom to explore a building at their own pace, to understand how it will feel and function. Walking across rooms, teleporting through doors, peering around corners – it’s all possible with a fully tracked roomscale experience.
The impact on the design process can be huge – but only if VR can be used at the precise moments where it adds most value.
It’s fine to wait days or weeks for an expert to produce a polished VR experience for communicating proposals to the client or the team. But for VR to truly influence design, it is the user of the CAD/BIM software that must have full control over when to enter the virtual environment. This gives them the opportunity to explore alternatives, evaluate the impact of modifications and detect errors early. Discovering issues weeks after a design has progressed can create delays and ramp up costs.
This presents a huge opportunity for software developers to create push-button workflows to move quickly from CAD/BIM to VR. Such tools not only bring in the model geometry but also materials and lighting, so nothing needs to be done post-import.
Many of the current developments centre on Autodesk Revit, with a number of applications now supporting both the Oculus Rift and HTC Vive Head Mounted Displays (HMDs). It is these two HMDs that currently give the most immersive VR experience. The Samsung Gear VR and Google Cardboard deliver a more basic VR experience without positional head tracking.
VR software
For the purpose of this article, we tried out three of the main ‘Revit to VR’ applications using Revit 2017. All of the tools work with both the Oculus Rift and HTC Vive, but we only tested with an HTC Vive, using two different workstations and GPUs.
Each application works on the premise that whatever you have in Revit – model, sun settings, lighting, materials and entourage – is automatically transferred into VR, simply by pressing a button, or a few buttons. This makes all three applications well suited to non-expert users.
Prospect from New York-based IrisVR can be used to create fully navigable VR environments in minutes (even under a minute) using a Revit plug-in. It also works with other CAD/BIM tools, including SketchUp and Rhino. The software places a big emphasis on performance rather than visual fidelity. It comes in two versions – a free version, Prospect Basic, for simple navigation; and a paid-for version, Prospect Pro, which adds more functionality and costs $200 per person, per month.
Enscape is a real-time rendering plugin, providing a live link from Revit to a desktop 3D game engine that can also be used for VR. It can take minutes (even under a minute) to go from Revit to VR and, uniquely, any change made in Revit, automatically updates in Enscape. The software places a big emphasis on visual fidelity. Prices start at $449 per year.
Autodesk Live is a cloud service and application that turns Revit models into a fully navigable desktop game engine experience where users can also enter VR at the click of a button. Files are uploaded to the cloud using the Autodesk LIVE Revit plug-in. Once processed, the game engine experience is downloaded to the desktop. This process takes around 10 to 15 mins with small to medium-sized models. Autodesk LIVE experiences can also be enhanced with Autodesk Stingray. Prices start at $30 per month, although this is an introductory offer.
VR headsets
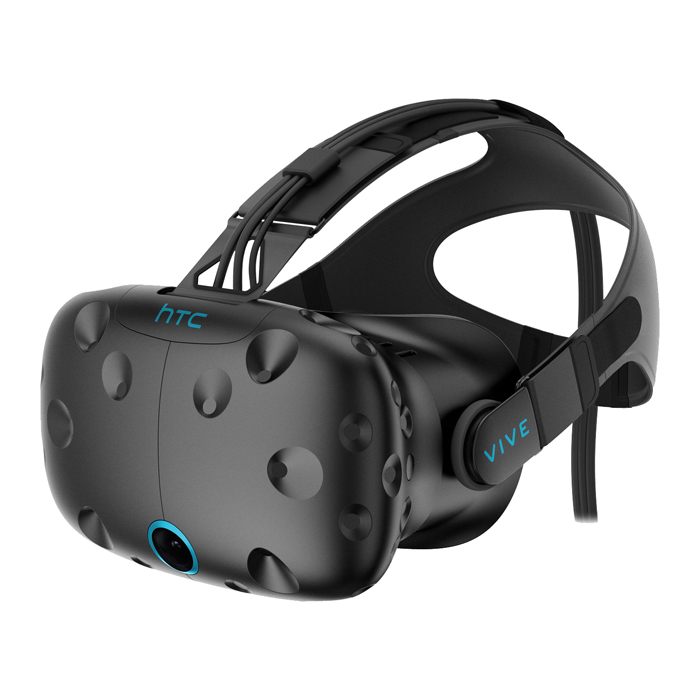
Entry-level smartphone VR headsets such as Google Cardboard can deliver impressive results, but for a fully immersive, navigable room-scale VR experience, you will need an Oculus Rift or HTC Vive. Both HMDs are tethered to a powerful 3D workstation via a long cable.
Room Scale, as the name suggests, means the VR experience takes place in a space the size of a typical room. For architecture, this can be a big plus, as users can explore virtual buildings on foot, taking small steps, with larger distances covered by teleporting. While room-scale VR is great for presentations and design review, a seated experience often works better when using VR as a design aid. This is simply because of the ease which with one can flip between Revit and VR.
The Oculus Rift started out life as a seated/ standing experience, where the user could only move small distances and navigation was performed with a gamepad. This type of experience still comes with the base package, but the Facebook-owned HMD now offers two optional hand-tracking Touch controllers and additional VR tracking sensors for a full room-scale experience. A total of three sensors are recommended. One comes with the standard headset, another with the Touch controllers and a third can be bought separately
The HTC Vive offers both a room-scale VR experience and a standing/seated experience, in spaces up to 5m x 5m. The HMD comes with two wireless controllers, each with four control buttons (touchpad and menu on the front, trigger on the back, and grip on the side). The kit includes two tracking base stations.
HTC also offers a Business Edition of the Vive, which includes dedicated phone support and better peripherals, including a 5m (16-foot) headset extension kit, and four face cushions, which are particularly useful if the HMD will be shared among many people. (Faces often get sweaty in VR). In the future it will also come with Vive Enterprise Software, an enterprise-friendly package that does not require users to install the games-focused Steam store.
Importantly, the Business Edition comes with a commercial warranty. If you use the standard consumer version for commercial use, your warranty is null and void.
Setting up the HTC Vive With a little bit of guidance and the right equipment, the HTC Vive is fairly easy to set up. Position the tracking base stations at opposite corners of a room, at a height of 2m, angled down to between 30 degrees and 45 degrees with an unobstructed view of each other. For a permanent or semi-permanent VR room, mount the base stations on the wall. For a portable set-up, use camera tripods.
Ideally, both base stations should be connected to each other using the sync cable, but it’s not essential. Both base stations plug into mains power. They are not connected to the HTC Vive or workstation.
The HTC Vive headset features a long, chunky cable that connects to a dedicated link box. The link box then connects to power, and to your workstation via USB 3.0 and a video cable (HDMi if you have a gaming GPU or DisplayPort if you have a pro GPU). When turning on your workstation, you may need to pull out the video cable or Windows will boot to the HTC Vive, rather than to your monitor.
Installation is very straightforward and the HTC Vive set-up software guides the user through the process step by step. Depending on the size of the room and the requirements of the user, the HMD can be set up for a full room-scale experience or a standing experience.
Detailed instructions can be found here.
Autodesk (Revit) LIVE 1.6
Autodesk LIVE has many different components – a Revit plug-in, a cloud service that creates .LVMD files and a standalone Autodesk LIVE Editor that reads/writes .LVMD files. There’s also a free viewer, Autodesk LIVE viewer, which is available for Windows or the iPad. This reads .LIVE files published by the Autodesk LIVE editor. The VR capability is only available on Windows.
To prepare a model, simply create a 3D view in Revit, then go to the Revit add-ins tab and click the ‘Go LIVE’ button. The software then does some pre-flight checks on the model and alerts you to any aspects that need your attention. This includes textures that can’t be found, section boxes that you might want to turn off and levels of detail that you might want to enable so that you can see all the model geometry.
Missing textures need be re-mapped manually. If they aren’t, the objects will just appear plain white. All other issues can be sorted out at the click of a button without leaving the dialogue box.
Hitting ‘Go’ will upload your file to the cloud for processing. As Revit files often stretch to hundreds of MBs, upload speed is important but, when on a decent connection, it is processing time that takes up the bulk of the process. On average, with 0.5Mb/sec upload, we found our 100MB to 200MB Revit test files took around 15 mins to upload, process and download the resulting .LVMD file to our desktop workstation. Larger files can take a lot longer. Also, depending on how busy the Autodesk LIVE servers are, you can end up in a queue, which can add a significant timelag.
.LVMD files can be opened in the Autodesk LIVE Editor, a real-time desktop game engine design viz environment that also has a VR capability. For this article, we’ll start off by looking at what can be done on the standard desktop application and then share our experiences of VR.
For navigation, use the mouse to orbit around a building or select a 3D viewpoint inherited from Revit. Alternatively, with ‘tap and go’, click on any location and the software will walk you there, automatically navigating stairs and doors. You can set the view height so it’s possible to see what an adult, toddler or wheelchair user might experience when interacting with the space.
Models can be viewed in different display styles, including a clay type render mode, which is useful for early-stage design, when the focus is on form and volumes. The default fully rendered setting shows you fully baked materials and ‘realistic’ RPC content, including people and trees. Overall, the render quality is very good.
Autodesk LIVE also includes tools to explore daylighting. Simply move time and date sliders and shadows adjust in real time. Revit lights can be set to turn on automatically at night.
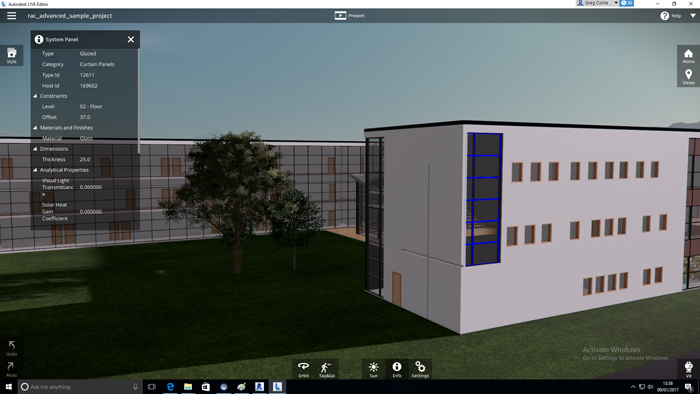
One of the most powerful capabilities of Autodesk LIVE is the ability to view the underlying BIM data within the model. Simply click on any object and the data appears in a dialogue box.
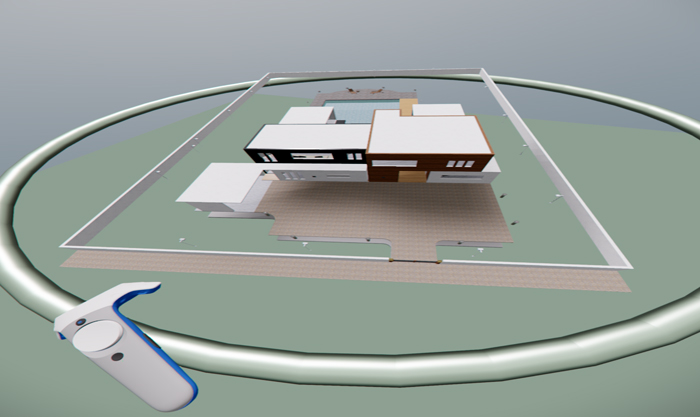
Moving into VR is easy. Simply click the VR button in the bottom right hand corner of the screen, put on the VR headset and you’ll see a bird’s-eye view of the model – the so-called Mini Map. The model is placed on a hoop, which the user can grab, spin and pull closer to the face to inspect from any angle. It’s a really good way to get an overall view of the project and to quickly zoom in on details. It’s possible to return to the Mini Map at any time, simply by pressing the Vive’s trackpad, which can be really useful for getting your bearings.
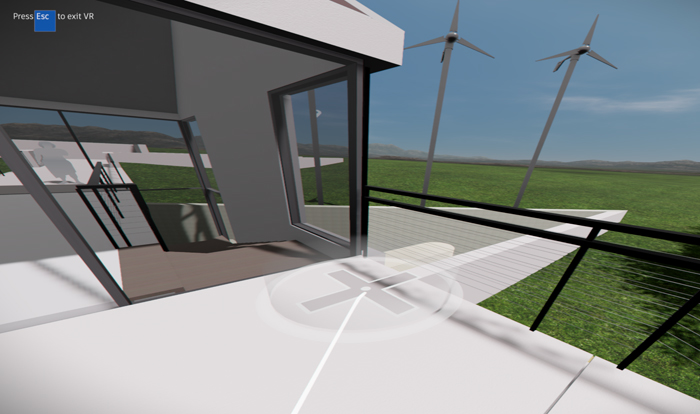
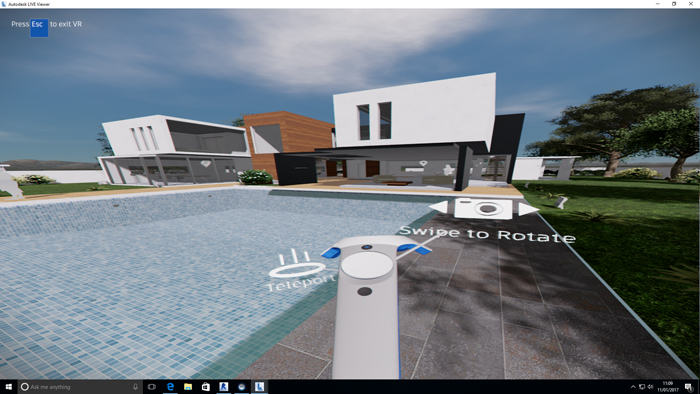
Most of the navigation in VR is done by teleporting. Simply use the HTC Vive trigger controller to point and click. In a flash, the model fades in and out and you’ll find yourself in the new location. Depending on the size of your room-scale set-up, you can also walk short distances.
Doors open simply by looking at the them. This adds to the realism and your understanding of the building, but can be a little annoying if you simply want to see the detail of a door – a glass door, for example, which you can see through anyway.
Unfortunately, most of the functionality from the Autodesk LIVE game engine experience is currently not available in VR. You can’t interrogate the model, nor change the time of day in real time without pressing ESC, taking off your headset and swapping VR controllers for a mouse. Autodesk LIVE VR is currently very much a navigation and viewing experience – albeit a very good one. However, it’s likely that Autodesk will add more functionality to VR as it works out the best way for users to access more advanced capabilities.
The visual experience in Autodesk LIVE is very good. This can be further enhanced with Autodesk Stingray, the underlying game engine technology on which Autodesk LIVE is built.
Autodesk LIVE models taken into Stingray can also be turned into fully interactive experiences (think light switches, running taps, TVs or adding mechanisms to flip between different design configurations). This level of customisation is complex and requires a design viz specialist or game developer. Moving forward, it’s likely that the Autodesk LIVE Editor will inherit some of Stingray’s capabilities, while maintaining the user-friendly interface.
In terms of workstation hardware, Autodesk LIVE VR has pretty high-end requirements, with the recommended spec being an Nvidia GeForce GTX 1080.
In terms of professional GPUs, all of our test scenes ran fine in VR mode on the high-end Nvidia Quadro P6000. We would also expect the Quadro P5000 to give a decent experience, but we didn’t test this.
The AMD Radeon Pro WX 7100 worked fine in desktop display mode, but in VR, we found it to be underpowered. Even with relatively simple models, the scene jumped around in front of our eyes, which made it disorientating and unusable.
The good news is Autodesk is currently looking at ways to reduce the hardware requirements so that Autodesk LIVE VR will also run on less powerful GPUs. The company told AEC Magazine that this could be achieved by tuning down some software capabilities. This would mean that the visuals would not be so compelling, but at least the experience would be fluid.
In summary, Autodesk LIVE offers a simple workflow from Revit to VR, good navigation and high-quality visuals with realistic materials. The big downside is the time it takes to enter VR. While 15+ minutes might not seem that long in the grand scheme of things, it does put a big barrier in place for true iterative design workflows.
Predictably, Autodesk is aiming to bring this time down. Currently, a simple change to the Revit model would mean a completely new upload, but Autodesk is exploring new methods so only deltas (changes) need to be uploaded and processed. It is also looking to reduce processing time by developing more computeintensive algorithms (think multiple CPU cores or highend GPUs for light baking) to better harness the scalability of the cloud.
Autodesk LIVE is available on a 30-day free trial, which allows ten jobs to be processed. A subscription costs $30 per month for unlimited use of the cloud and the app, but this is an introductory offer so is likely to change.
Update – Nov 2017
Since this article was written, Autodesk LIVE has been rebranded to Autodesk Revit Live.
There have also been a couple of main features added.
First up is Level of Detail geometry generation and material instancing, which Autodesk says results in a 20% performance improvement for users when working with large models [e.g. a hospital complex] and VR. Autodesk Revit Live now also suggests a recommended optimization setting based on your hardware.
The second is that Revit Live now suports Revit LT as well as full-blown Revit.
Autodesk is gearing up for a new release any day now, so expect a raft of new features in what we presume will be Autodesk Revit Live 2.0.
Enscape 1.8.3.3
Enscape is a real-time visualisation tool designed to work specifically with Revit. The software can be used on a standard display or in VR. It offers a push-button workflow from Revit to VR and, uniquely, a live link between the two applications.
Once a link is established, any changes made in Revit – be it geometry, materials, layers or lighting – will automatically appear in Enscape seconds later. With other Revit to VR applications, the entire RVT file must be processed again.
This excellent feature makes Enscape incredibly well-suited to iterative workflows. Make a change in Revit, then, in less than the time it takes to put on your HMD, assess those changes in VR. Should you so desire, live updates can be paused.
Enscape’s unique workflow is possible because of the way the software works. Rather than exporting geometry from Revit, it only sends graphics information to Enscape, which is then rebuilt as proxies.
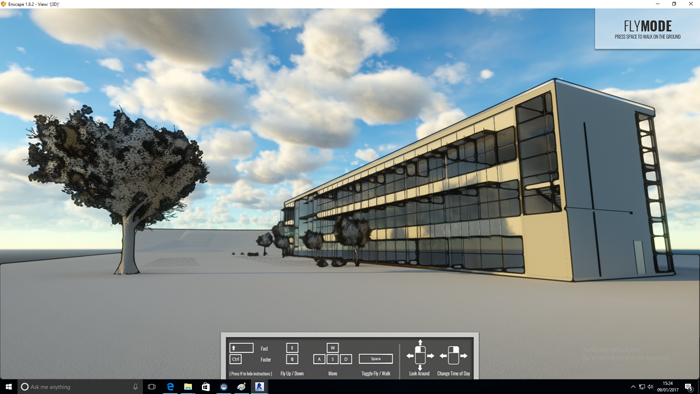
The software is installed as a plug-in inside Revit and is given its own tab. To enter VR, simply click the ‘VR’ Button, pick a predefined Revit view from the pulldown list, then hit run. In less than a minute, you’ll be able to see your Revit model in VR.
The best way to enter VR is usually from a bird’s-eye view, as this gives a good overall picture of the project. However, this initial view must be set up properly in Revit. Enscape has a maximum teleport distance, so be careful not to be too far way. If you are, the only way to get closer to the building is to fly there using the Vive’s trackpad controls (the left controller moves you left and right, the right controller moves you up and down) and this can take some time. You also need to ensure your model has some surrounding terrain.
Once you are close enough, navigation is intuitive. You can teleport through doors – both solid and transparent – which is great, but you can’t teleport through certain types of windows. This can be annoying if you quickly want to jump outside to view the exterior of a building. To get around this, Enscape lets you fly through any solid object – windows, walls and all. Flying is very useful for viewing buildings from above, from any angle. However, it did make us feel a bit sick and, at times, gave us vertigo.
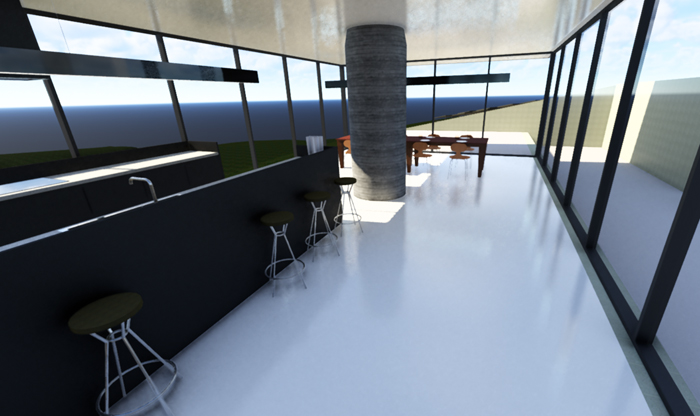
Enscape offers limited functionality inside the VR environment. You can change the time of day using the grip buttons on the side of the Vive controller. Shadows will change in real time and lights will come on at night. Unfortunately, Enscape does not display a clock in VR, so the wearer of the HMD cannot assess lighting at specific times of the day. A clock is visible when viewing the model on a monitor, so the wearer can momentarily lift the HMD, but it’s a bit of a fudge.

If you want to capture certain elements of your building to jog your memory or for basic design review, you can also take s c r e e n sh o t s with a custom keyboard hot key. This is pretty tricky with a standing, room-scale experience (think one leg, big toes, small keys). Ours is the voice of experience as we used this exact method to produce the screen shots for this review.
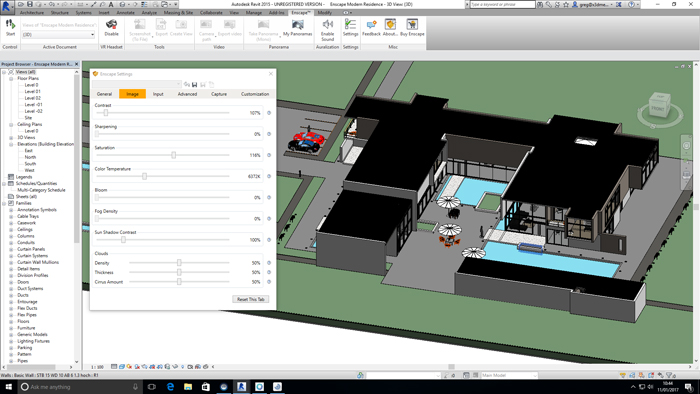
For more control, you will need to take off the HMD and use a mouse in Revit. Through the Enscape settings dialogue box, users have full control over contrast, colour saturation and colour temperature, which is great for getting the desired look. There’s a papermodel mode, which strips out all materials but retains light and shadows. This is useful when you might not have correct materials assigned or simply want to dumb down the view to emphasise form. A polystyrol mode gives the effect of your building being made from Styrofoam. Both modes can be turned on at the same time. Line thickness can also be changed to enhance the edgfes of objects.

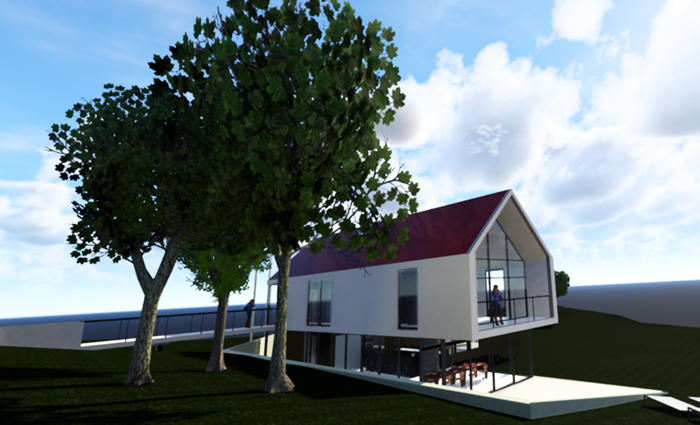
To bring scenes to life, Enscape can automatically replace planar ArchVision RPC models in Revit with more realistic 3D entourage. This includes 3D people and trees with individual leaves. The software can also directly support all types of RPC content, including premium human models from RPC content partner AXYZ.
Render quality, in general, is excellent. The software supports Global Illumination, simulating how light bounces off objects onto other surfaces. This can be turned on and off.
Enscape offers plenty of scope to take visual realism to the next level, by tweaking lighting and materials or adding custom Entourage. Phil Read from Enscape reseller Read | Thomas, who supported us during this review, has some great tips on self-illuminating objects, material bump maps, reflectivity and transparency.
Enscape offers more than just high-quality visuals. To deliver an even more realistic experience, it allows you embed sound sources within your Revit model. Here WAV files are added to Revit Family Components, such as a stereo playing music or birdsong from a tree. The volume of the sound increases as you get nearer and it also responds to the acoustic qualities of the objects within the space, which really adds to the realism.
With all its visual quality, Enscape has pretty high GPU requirements, with the developers recommending at least an Nvidia GTX 980 or Quadro M6000 GPU. The software performed very well with our Nvidia Quadro P6000. It did not work with the AMD Radeon Pro WX 7100.
In summary, Enscape is an excellent choice for Revit to VR, offering a seamless workflow with near-instant updates. This is great for architects or engineers who want to jump between Revit and VR to assess different options or for presentations where clients can immediately see the results of their feedback. Enscape also has the added benefit of offering a desktop game engine experience using a standard 2D display. And models can be distributed as a fully contained .EXE, which can be viewed without any additional software.
The visual quality is excellent, encouraging exploration of materials and finishes, as well as form, fixtures and fittings.
However, some of this is lost in VR, simply because of the display resolution of the HTC Vive and other HMDs (you can still see the pixels).
It would be great to see more control given to the wearer of the HMD for things like mark-up, but with Revit driving the application in real time, this is less of an issue.
Enscape is available on a free 14-day trial. Prices start at $449 per year.
■ enscape3d.com ■ readthomas.com
Update – Nov 2017
Since this article was written, there have been a number of features added to Enscape.
The major emphasis has been on increasing visual quality and realism. Key enhancements are detailed below.
Realistic Lighting: Reflections and indirect lighting are now done using real-time path tracing, which is more faithful to reality.
Realistic grass: Enscape can now draw real geometry grass blades for more realism.
Trees have been reworked to better resemble an architectural rendering look.
Decals such as posters, can now be added to scenes.
Polystyrol Mode has been made more realistic with physically correct subsurface light scattering.
Performance has been improved to better support larger projects and slower workstations.
IrisVR Prospect 1.1.0
Out of the three Revit to VR tools featured in this article, Iris VR Prospect is the only one to concentrate solely on VR (there’s no formal desktop experience, although spectators can look at the monitor to see what the wearer of the HMD is seeing). This focus helps make it the most mature in terms of what you can do inside VR, including real-time daylighting, layer management, annotation and screen capture.
IrisVR Prospect also has the added benefit of being able to work with other applications, including SketchUp and Rhino. There are plans to add support for ArchiCAD, MicroStation and Navisworks. This expansion will help extend the focus beyond architecture and into infrastructure.
Having this breadth of functionality calls for a higher price tag of $200 per user, per month. However, there’s also a free version, Prospect Basic, that strips back all the extended functionality, but still includes the core push-button workflow for file conversion and VR viewing. With Prospect Basic, it’s not possible to save projects as native Prospect files (.IVZ). The VR experience always has to start in the CAD or BIM software or with a neutral 3D file.
Models inside IrisVR Prospect appear more clinical than in Autodesk LIVE and Enscape. Textures are less realistic and RPC content is represented by outlines, but the wearer of the VR headset still gets an excellent sense of presence and scale. Materials and outlines can be toggled on and off by hitting M and O on the keyboard. The resulting ‘white model’ gives a schematic feel and is great for conceptual design.
By offering a less visually rich experience and by performing heavy geometry optimisation, Prospect is able to run on more modest workstation hardware. We found that the entry-level VR graphics card, the AMD Radeon Pro WX 7100, delivered an excellent experience with all our test models.
Prospect installs as a plugin inside Revit, which can be accessed via the add-ins tab. Simply select your 3D view, then click ‘View in VR’. Once your file is ready, click ‘launch’ and you’re straight into VR. Most of our files took a minute or less to process.
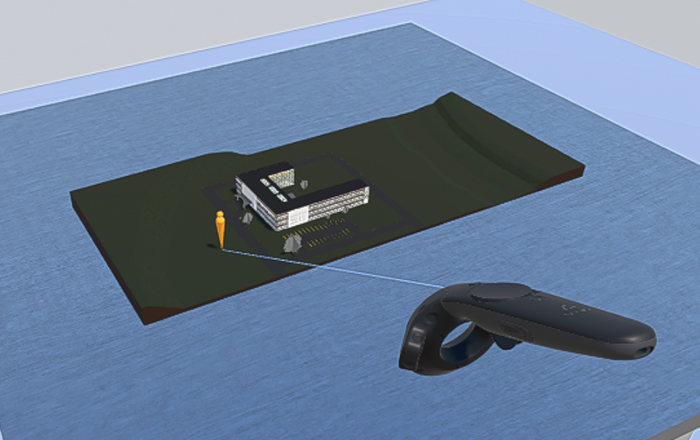
In VR, you first enter Scale Model Mode, where you’ll see your project on top of a plinth. From this bird’s-eye perspective, the model can be rotated using the HTC Vive trackpad. Lean forward to get a closer view of the building – even stick your head inside.
To view the building at human scale, simply point your cursor at a surface on the model then click the trigger button. You can teleport anywhere where it shows an avatar. To stand outside the building, the Revit model must include some form of surrounding topography.
For navigation, take short steps in your VR ‘room space’, then travel larger distances by teleporting. A circle denotes places where you can teleport. A cross shows where you can’t.
Navigation is pretty easy, although there are some limitations. You can teleport through transparent walls, doors and windows, but not through solid doors or walls.
There are a few ways to get around this. One option is to move close to a door, reach through until your control disappears, then click the trigger to teleport to the other side. Another is to make all doors transparent in Revit. A third is to turn off all door layers, leaving the model with door frames. The developers are looking at ways to improve this, including X-Ray modes or the ability to select an element in VR, and turn off all similar objects.
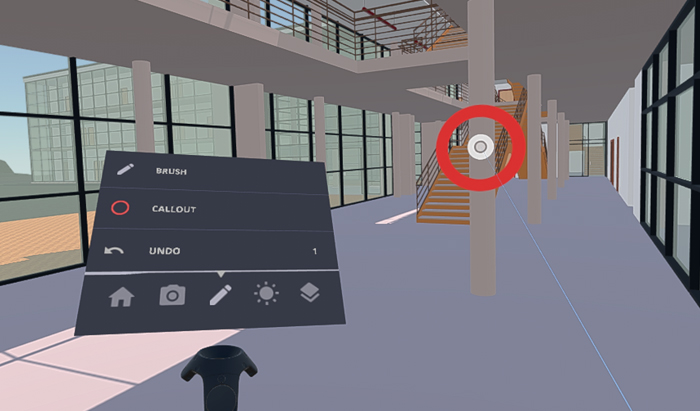
One of the Vive’s controllers is used for navigation, the other to hold the tool palette, which includes Home, Screen Capture, Annotation & Callouts, Daylight and Layers. To access tools, simply use the other controller to point and click at the icons.
The home button puts you back where you started, in Scale Model Mode. Screen capture takes a snapshot of where you are looking.
There are very simple annotation tools, which allow you to redline the 3D file with a freehand marker or draw a fixed circle callout at the centre of your view. Once you’ve completed the markups, these can be saved with the screen capture tool. IrisVR admits that these tools are quite basic and will be improved in subsequent releases. In the future, there may be the ability to assign custom text and symbols to objects.
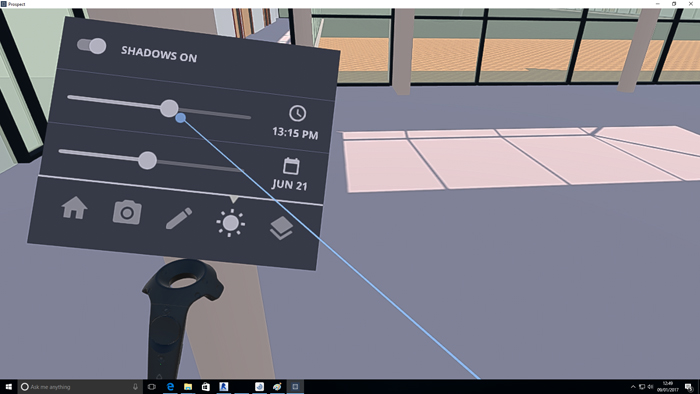
One of the most powerful capabilities of Prospect is the daylighting tool, which allows you to see how light and shadows change with time or date, based on the geolocation of your Revit model. Simply use your Vive controller to move the appropriate sliders on the tool palette and see the light and shadows update in real time. The sliders can get a little frustrating if you move your cursor slightly off centre as it then stops scrolling. Some leeway would be great here, just like when you’re in Windows and it still stays engaged even when you move your cursor off the scroll bar. IrisVR told AEC Magazine it will be addressing this in the next release.
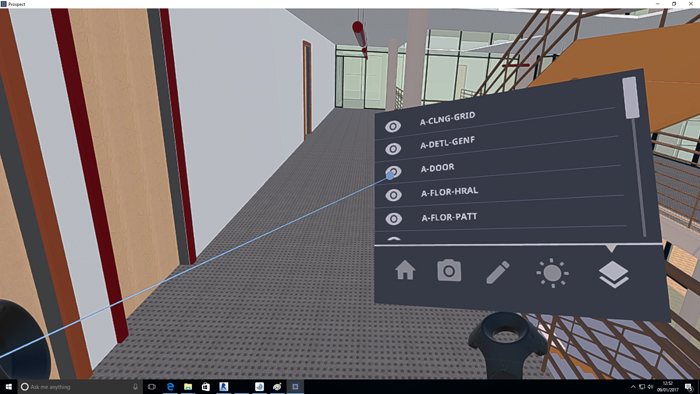
Layers can be a powerful way of viewing model data; for example, you can strip back everything to the steel frame, view different design phases, toggle between materials, or explore different furniture arrangements. To get the most out of this feature, users will need to do some work in Revit upfront.
Layers are listed alphabetically, so it can be a bit of a pain if the layer you most frequently want to turn off lands at the end of the list. Renaming layers is the obvious solution, but this could impact company layer conventions. Layers suffer from the same scrolling issue as daylighting.
IrisVR already has lots of ideas on how to improve the software. It is exploring ways to view metadata, simply by clicking on an object. IrisVR admits that the only way to do this would be to load all the objects individually, which would impact performance, so there is still some work to do here. (One of the reasons Prospect delivers such good performance in VR is because objects are currently grouped to reduce draw calls.)
Collaboration is also going to be a big focus moving forward. Ideas currently being explored include project libraries, an easy way for clients to view IrisVR projects, and shared sessions, where multiple users can exist in the same project, with each participant represented by an avatar.
In the more immediate future, the next release of Prospect will be able to load in perspective cameras from Revit, to allow users to jump between waypoints at the click of a button. IrisVR sees this as a useful way to quickly get a bird’s-eye view of the project or to guide clients through a building, rather than letting them wander off on their own.
In summary, IrisVR stands out for its expansive toolkit. The daylighting and layering tools, in particular, are very impressive. The push-button workflow where models can be processed very quickly makes it well-suited to design iteration workflows. The relatively low GPU requirements and free version will also make it exceedingly attractive to smaller AEC firms with tight budgets. With the prospect of BIM data being exposed and better collaborative tools, we’re really looking forward to seeing how this impressive tool develops.
IrisVR Prospect Pro is available on a free 21-day trial. Licenses cost $200 per user, per month. Iris VR Prospect Basic is free.
Update – Nov 2017
Since this article was written, there have been a number of features added to IrisVR Prospect.
Measuring in VR: a new measuring tool allows users to verify sizes, distances, and clearances in real scale in Virtual Reality.
Traveling between viewpoints: 3D views from Revit can now create viewpoints within Prospect. These are camera locations that you can use to walk a client/colleague through a project to present the flow of space more effectively.
Sectioning/modifying models in Scale Model Mode: In Scale Model Mode user can now lift/move the model around space, rotate it, zoom in, and section it.
360° Panorama: A new 360° Capture tool allows users to instantly capture a 360° panorama from within Prospect.
Multi-user collaboration: Earlier this year, IrisVR previewed a multi-user mode that will allow users anywhere in the world to collaborate on AEC projects in VR. The technology will be available by the end of the year.
Revit to VR – workstations and GPUs
Virtual Reality demands extremely powerful workstation hardware. While most modern CAD workstations should satisfy the m i n i – mum requirements for CPU, memory (3.30GHz Intel Core i5 4590/8GB RAM or above), and USB 3.0, they will likely fall well short on graphics (GPU). Both the Oculus Rift and HTC Vive require a GPU capable of sustaining a minimum frame rate of 90 FPS while in VR. Anything below this and the model can jump and the user can experience nausea or motion sickness. This is because what the user sees on the HMD is not what the brain expects to see, based on head movements.
To make things easier for those buying VR workstation hardware, both AMD and Nvidia brand their GPUs ‘VR Ready’. This stamp of approval works well in the games market, as games contain fixed datasets designed to run on specific GPUs. However, just because a professional GPU is labelled ‘VR Ready’, it does not mean it will work with all professional VR applications out of the box.
Performance is both applicationand model-dependent and is influenced by the size of the da taset, the complexity of the geometry (number of polygons), how well the application optimises geometry for VR, as well as lighting and textures. Custom Revit objects, particularly those with curves, can eat up GPU resources, especially if there are hundreds of them within your model.
For example, the AMD Radeon Pro WX 7100, a low-cost ($799) professional ‘VR Ready’ GPU, gave us a comfortable experience with IrisVR Prospect out of the box. But it stuttered with Autodesk LIVE and didn’t work at all with Enscape. For these more demanding applications, we needed the considerably more expensive Nvidia Quadro P6000 ($6,999). We imagine the Nvidia Quadro P5000 ($2,499) would probably be powerful enough to deliver a good experience in Autodesk LIVE and Enscape, but we didn’t get to try this. Ideally, you should try before you buy, using your own datasets.
In many cases, a simple graphics card upgrade can turn your desktop CAD workstation into one capable of running VR. However, this depends on the type of workstation you have; all the aforementioned GPUs need an auxiliary power connector and between 150W and 250W of available power. And all of them, bar the AMD Radeon Pro WX 7100, take up two PCIe slots. You need to make sure your CAD workstation can satisfy these demands. You may need to upgrade your Power Supply Unit (PSU) as well.
Of course, there are plenty of pre-configured ‘VR Ready’ desktop workstations. These are available from HP, Dell, Lenovo, and Fujitsu, as well as custom system builders like Scan, Workstation Specialists and BOXX. The Armari V25 is a slimline, custom-built VR workstation with a chassis designed to house the HTC Vive’s Link box.
VR-ready workstations don’t have to come in tower form factors. Dell’s new All-in-One, the Precision 5720, features a 27-inch screen and an integrated AMD Radeon Pro WX 7100 GPU. Also coming soon are a whole range of VR-ready mobile workstations, featuring AMD Radeon Pro WX 7100, Nvidia Quadro P4000 and P5000 GPUs. We expect there to be a lot of interest around VR-ready mobile workstations for those wishing to take VR to client offices.
VR is not limited to professional GPUs. There are number of consumerfocused AMD Radeon and Nvidia GeForce GPUs that meet or surpass the minimum requirements for both the HTC Vive and the Oculus Rift.
These GPUs should work perfectly fine with all the Revit to VR applications mentioned in this article. However, they are not certified for Autodesk Revit or other CAD /BIM applications, which will be very important for some firms.
Revit to VR – conclusion
It’s still very early days for VR but we are already starting to see the extensive benefits that this exciting technology can bring to architecture and engineering – from functional and aesthetic evaluation of projects to daylighting studies, markup and client communication.
We’re excited to see how these capabilities grow over the coming years. Applications like Enscape will likely keep their strong focus on using VR as an extension to desktop design visualisation, but it will be interesting to see how products like IrisVR Prospect evolve to better support design/review workflows.
VR is great for identifying issues with buildings, but it’s very much a one-way street. The process would benefit greatly from being able to capture this information and feed it back into BIM authoring tools. Technologies such as the BIM Collaboration Format (BCF) or voice recognition could play important roles here.
Since this article was written in February 2017 all of the tested VR software products have received new features. We have listed some of these features at the end of each review.
Autodesk LIVE has also been rebranded to Autodesk Revit Live.
In addition, Nvidia has released a single slot, professional VR Ready GPU called the Nvidia Quadro P4000. At $999 it is considerably cheaper than the Nvidia Quadro P5000 and P6000. We have tested the Nvidia Quadro P4000 with IrisVR and Autodesk Revit Live and it performs well. Check out our full review at tinyurl.com/P4000-AEC
AMD has also released two new dual slot pro VR capable GPUs, the AMD Radeon Vega Frontier Edition ($999) and AMD Radeon Pro WX 9100 ($2,200), both of which are considerably more powerful than the AMD Radeon Pro WX 7100.
More VR tools for Revit
Revizto is a standalone real-time viz tool with a focus on collaboration, co-ordination and issue resolution. It works with Autodesk Revit, ArchiCAD, SketchUp, AutoCAD Civil 3D, Navisworks and AutoCAD, and also supports FBX, IFC, BCF and PDF file formats. Revizto runs on PC, Mac, iOS and Android, as well as supporting the Oculus Rift and HTC Vive.
LumenRT from Bentley Systems is a game engine design viz application that plugs directly into Autodesk Revit, ArchiCAD, Bentley MicroStation, Sketchup and others. It can also import models from many more applications. Users then bring the model to life by adding entourage, including realistic trees, people, water, wind and moving vehicles. LumenRT can currently create VR panoramas but will add support for the HTC Vive and Oculus Rift later this year.
Click here to read our Beginner’s Guide to VR for Architecture
If you enjoyed this article, subscribe to AEC Magazine for FREE