From an internationally-celebrated sporting event, to a seat of learning and a long-term domestic build, design visualisation is proving vital in every stage of the build process.
Designing London’s International Quarter
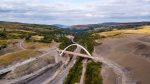
Part of the London 2012 Olympics ethos is to leave a lasting legacy for the area in the east of the city where the world’s greatest sporting event will take place.
In addition to the Athletes’ Village, Olympic Stadium and other sporting venues, the International Quarter is a four million square ft business development that will house Europe’s largest urban shopping centre with 1.9 million square ft of retail and leisure space including bars, restaurants and parkland.
London-based visualisation company Glowfrog Studios took on the task of providing the imagery for the proposed office buildings on the site, while encompassing all the other Olympic site structures that are yet to be completed.
The commission was threefold. The client Lendlease wanted an aerial CGI looking across the Olympic site to Canary Wharf, Greenwich Peninsula and the city; a high-level shot from the top of one of the new corporate buildings with views over the Olympic Park; and a series of panoramic photographs taken at different levels from the location of the proposed building showing views of Olympic Park and the City.
Just to make the brief a little harder, the client provided aerial photography shot into the sun on a hazy January day, all of which was unusable. Glowfrog instead chose to recreate the view entirely in Photoshop, building a collage of photographs, 3D models and digital painting to get the desired effect.
Over four weeks a team of three, including a 3D artist and Photoshop retoucher, worked between Autodesk 3ds Max building models and artistic work using Autodesk Maya to complete the project, before the final renders were done using Mental Ray.
www.glowfrog.com / www.lendlease.com

Pembroke College
In a city famous for its educational establishments, Pembroke College has ambitious plans for a spatially complex expansion of its central Oxford campus.

Blink Image was brought in to produce a series of photorealistic images and a walkthrough animation of the proposed new campus, explaining how the project fits around the existing listed buildings and gardens.
The 3D models were created by Blink from the architect’s drawings. “We had drawings for every last design detail, which on the one hand was a real challenge but on the other was really nice to be working to that level of detail,” said Blink Image director Richard Birket.
“Once full resolution snapshots along the animation path had been signed off, we submitted the numerous render jobs — one per camera, both GI pre-passes and full render passes — to our in-house render farm.”

The animation was rendered at 720p and composited using After Effects. Frame render times varied between 10-30 minutes depending on complexity of the shot. Architectural modelling was performed in AutoCAD Architecture, transferring to 3ds max for animation and texture/lighting assignment, before rendering in Vray.
From the architectural plans there was some confusion over the complex use of spaces and different levels, so it became important that the visualisation could unravel that for both a technical and non-technical audience.
Careful use of the orientation model within the animation and visual referencing back to the existing college, with which everyone was familiar, showed the relationships between these buildings.
“We always try to use something new to us in every job that we undertake so that we are always expanding our skill set,” said Mr Birket. “The main ‘special technique’ in this presentation was in the introductory section of the animation where we had the idea of giving the overview/orientation model the appearance of a physical, architectural model sitting on a desk in the bursar’s office. We achieved the miniaturised look through a combination of model-type textures, subtle HDR lighting and shallow depth of field applied as a post-production process.

York House
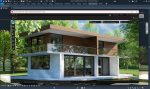
York House is a project that started life in 2008, with a commission for design visualisation specialist Atelier York to produce a few relatively simple exterior renders to better help the architects visualise their design.
A few simple stills and a quick fly-through later and the project was granted planning permission, but the visualisation work did not end there. Four years later (including a client-induced pause) the project has resulted in 15 minutes of animations, including full interior walkthroughs and external fly-arounds, and over 40 still images
“We were supplied with detailed CAD drawings by the architects, including plans, sections, elevations and detail drawings for fixtures and fittings,” says Alex York, architectural artist and founder of Atelier York.
Taking this as the starting point the majority of the modelling was handled by importing the plans, elevations and sections into 3ds max that were then traced using splines, and extruded and tweaked using Editable Poly.

Once the structural geometry was signed off furniture and other detail models were produced, before materials, textures and lighting was applied.
The team of three used a vast combination of Autodesk 3ds max design, mental ray (integrated into 3ds max), Adobe Photoshop, Adobe Lightroom, Autodesk Backburner, Adobe After Effects and Adobe Media Encoder, as well as many plug-ins and scripts for 3ds max (some off-the-shelf and some written in-house to help with common tasks).
Using a photograph-based workflow, with real camera exposure controls to simulate a real lens, photometric spotlights, strip-lights and kelvin values to achieve an accurate and consistent white balance meant some parts needed extra mapping and texture layers. York’s main headache, however, resulted from memory management within mental ray and 3ds max.
“We spent a great deal of time optimising models, texture maps, lights and render settings to keep memory usage down as low as possible and render times as low as possible. With some shots having over 100 pieces of high detail furniture and objects, up to 100 lights and many texture maps, our workstations were under a great deal of pressure.”
“But planning ahead allowed us to maintain a workable level of detail throughout each shot that was not only manageable but cost-effective.”