In the latest of a series of articles on Autodesk Revit, CADline’s Paul A Woddy looks at how ‘Shared Parameters’ can extend the capabilities of scheduling and customised component libraries.
In the January/February issue of AEC we discussed the topic of content creation using Autodesk Revit. What I would like to do over the coming months is to look at how we can advance from there to create better, more intelligent content which will not only be graphically correct, but contain the type of background information which adds unprecedented levels of efficiency to the design process.
Standard Revit content can be found on the installation CD and various web pages such as
- http://revit.autodesk.com/library/html/index.html – This is the official Autodesk repository for the content created by them.
- www.revitcity.com
- www.augi.com
Sites which promote sharing of end-user created families. The Revit City site is my personal favourite for ease of use and volume of content.
The official Autodesk created content is generic and although it may be based on manufacturers’ data, all identifying marks have been ground off before publication. This is all well and good if you are looking to put together a nice model of a house and need to show some furniture in there for perspective, but it falls far short of making use of the enormous power of fully attributed content. A default schedule is consequently restricted to automatically tell you that you have placed nine light switches in a building, but with a little extra forethought in content production, the same schedule could tell you the manufacturer, range, model, relevant British Standard, circuit / ring-main number, double or single pole, preferred supplier, cost and order lead time.
There is no reason why the schedule, which is being produced simultaneously as you develop your design, cannot form the basis of your quotation request form or even an order form.
Many people see Revit as a good 3D modeller, which in my opinion is like looking at the Louvre and commenting on the ‘nice windows’. A Revit model can be viewed from a 3D perspective, which is great for communication and marketing, but this is simply one of the database interrogations. If you drill down into the same database you will see tabular information which identifies and specifies every single element of the design.
Most of the content found on the CD and on the official web pages mentioned above can be classified as modelling components. Some are quite complex in their geometry and parametric controls, but this is still aimed at producing a graphical representation of the object. I would like to focus on how to expand the text attributes behind the modelling and make full use of your data input time.
In the process of creating content, we can add parameters to the object which can be derived or calculated values, yes/no visibility toggles or even nested family objects created separately and controlled within (look out for another upcoming article on this subject).
Shared Parameters in practice
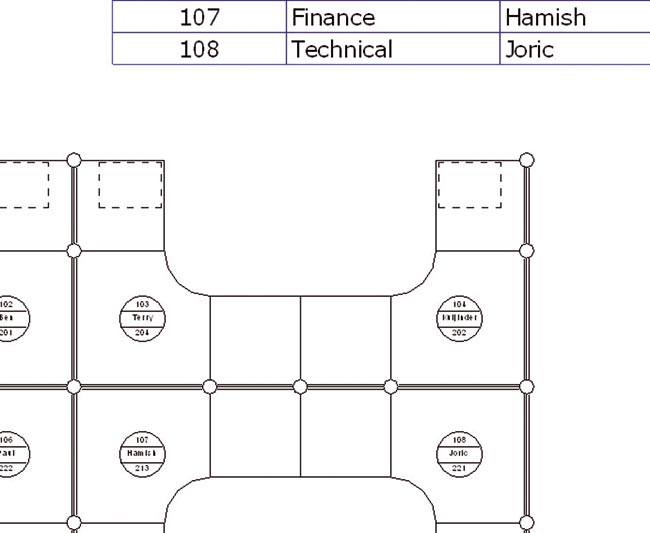
You have a requirement to replicate a piece of office furniture in Revit, and show the revised office layout using the new components. For presentation, you need to represent the layout in plan, with the desk number, occupants name and telephone extension number shown on each desk. The same information needs also to be shown in a table, with the department and direct dial data (see Figure 1).
What we need is a method of relating the parameters in a geometry family with the similarly named parameters in the tag family as well as the project containing the schedule. This central hub is called a shared parameter file, which is a simple txt file which the various families and projects can look toward. Delving into the shared parameters can sometimes be viewed as a dark art, but need not be and will greatly improve your efficiency when you master it.
Shared Parameters allow the same data to be referenced in multiple locations. They also assist in naming convention for user-defined parameters, eliminating the problems of typing errors and case sensitivity to help maintain quality and standardisation of bespoke families across a multi-user design team. They can be used to specify identity data, lengths, numbers etc. as usual.
Creating the Shared Parameters
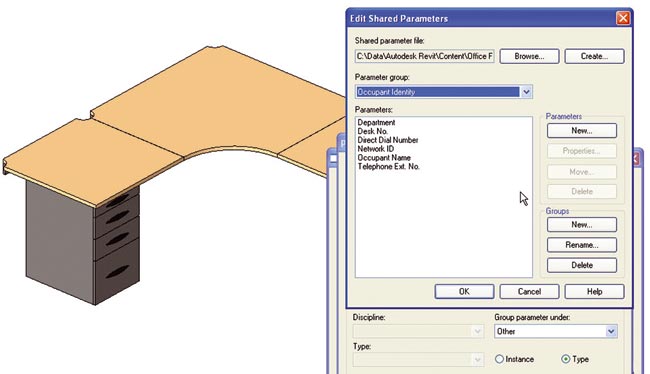
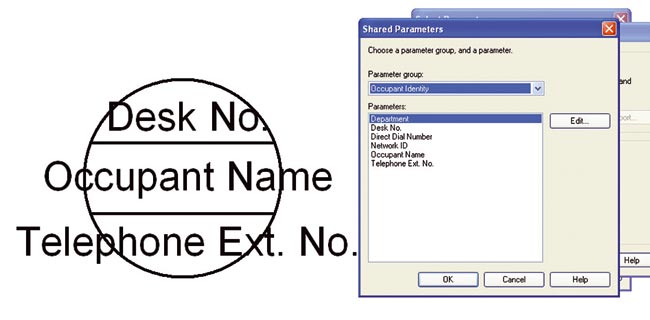
When creating your furniture, add a parameter and click on the Shared Parameter option. It will prompt you to set up a text file storing parameters filed as required into relevant groups. Once assigned to the component family, shared parameters act in the same way as normal parameters created in isolation (see Figure 2).
Now create a generic tag and point it toward the furniture category through the Family Category and ParametersÍ option in the Settings menu. This will ensure that the tag will look at the correct type of component. When you add a label to the tag, as normal, you can refer to the same Shared Parameters text file and select the required parameters from the list. By doing this, you are ensuring that both the desk and the tag are referring to the same desk number and occupant name, as opposed to creating disparate data (see Figure 3).
When both the desk and the tag are loaded into a project, we can produce an annotated floor plan and accompanying furniture schedule as required (see Figure 4).
Conclusion
These principles can be used to tag and schedule anything from lighting fixtures to floor tiles and allows the automated display of required information pertaining to components. The downside for the individual is the time taken to create these super-components in the first place. If we look however at the benefits for manufacturers of construction components in being pre-specified by the designer, it is small wonder that as the number of Revit users increase, the manufacturers are taking note and starting to build fully loaded Revit components of their own product ranges.