Tim Power from architectural 3D imagery and animation company Virtual Resolution and Chris Senior from BIM consulting firm Revit Factory share their tips on how to best use Revit BIM models to create advanced 3D visualisations.
As the use of Building Information Modelling (BIM) becomes more widespread, visualisation studios are starting to use BIM models to create advanced 3D visualisations.

BIM is still a young environment and understanding the paradigm shift from CAD to BIM can sometimes be confusing for many design professionals.
Does BIM mean 3ds Max is obsolete? Is a CAD technician now a visualiser? The boundaries are blurring so it is important to understand exactly how a BIM model should be used and the benefits of its interoperability with other software.
Virtual Resolution has been working with Revit Factory for a number of years and has been slowly refining the workflow for the best import / export process from Revit to 3ds Max.
There are an endless number of methods and steps to create an image from within a Revit model, or in a third party rendering package. To add to this, each visualisation studio will do it slightly differently. In this brief overview we have outlined the process that we tend to use.
Some customers ask why use 3ds Max when you can create a visualisation image within Revit itself? In short we have reached the conclusion that it comes down to user competence, personal preference, the project stage, budget and time.
The skills of the Revit user and quality of the model can hugely influence how the image is rendered in both Revit and 3ds Max. It is not just about balancing component complexity with performance. Ensuring materials apply correctly to Revit Families, sub-objects are assigned correctly and export options are carefully chosen, will all reduce issues further down the line.


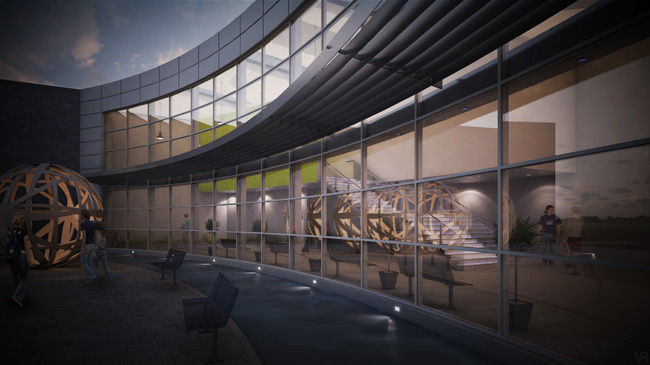
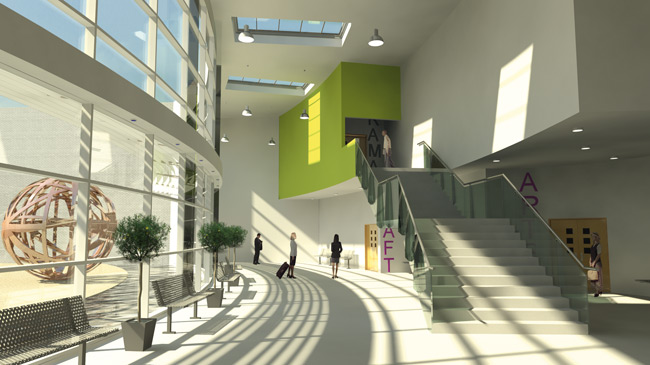
The four images opposite show the difference between a Revit image created completely within Revit 2011 and a 3ds Max Design 2011 image created with Vray as the lighting package. Both sets of images use the same base model as a starting point, but have then been separated into the two different rendering workflows.
When put side by side you can see the physical differences in the two types of render. Hidden under the surface though are a number of key facts that may influence a decision of which rendering option to use, including shorter production time and render times for 3ds Max.
| Details | Revit | 3ds Max |
| Production time starting from same basic white model | 11 hours for 2 Images | 7 hours for 2 Images |
| Render time @ 4,000 x 2,244 pixels @ 300dpi | Internal day image 1.5hrs External night image 6hrs |
Internal day image 1.5 hrs External night image 3.5hrs |
| No. Polygons | Unknown | 800,000 |
| No. Lights (Day shot) | 1 Sunlight | Physical sun and 5 artificial lights |
| No. Lights (Night shot) | 45 Artificial lights | 10 Artificial lights |
| File size | 12,890kb | 379kb |
| Processor | Intel Core i7 | Intel Core i7 |
| RAM | 12GB | 12GB |
| Operating System | Windows 7 Professional | Windows 7 Professional |
Revit export process
Tips for exporting the model, by Chris Senior, owner Revit Factory.
Optimisation: To optimise render speed, hide anything that is not visible in the camera view. If you cannot see it in the scene (i.e. behind the camera or behind a wall) hide it or delete it. Make sure you are working on a copy of the model if you start deleting elements.
Another option is to use a section box, which will provide a 3D crop around the view (although these are sometimes tricky to manipulate in a camera view).
WYSIWYG: What you see is what you get. Exporting the camera view will mean only elements that are turned on in the model will be exported so you do not need to worry about hidden elements coming out in the export.
Export methods: Revit can handle various output formats so choosing the right one for you could depend on what application you are importing to.
Exporting to DWG: To export to DWG go to Revit Icon > Export > CAD Formats > DWG. Under View/Sheet Set, make sure the correct view is selected. Under DWG Properties set how the file will be translated into DWG format.
Layers and properties: Commonly overlooked, click the three dots at the end of this field to check that the sub-categories in Revit are exporting onto separate layers. A simple example of this is the Glass sub-category of Windows/Doors/Curtain Walls etc, which by default exports onto the same layer as the frame. Not very useful when you want to apply different materials. To amend this, go to the Revit Icon > Export > Options > Export Layers DWG/DXF and change the layer name for the glass sub-categories as required.
Tip: If the families in the project have not been built correctly with glass on a sub-category you will not see any difference. To check this, go to Visibility/Graphics and turn every category off and then turn on only the glass sub-categories. If all the glass stays visible, you know it is good to go.
Export solids: There are two DWG solids formats both of which have their good and bad points to be considered.
ACIS Solids export Revit elements as single elements and can include multiple materials. Render times in 3ds Max are more efficient than with Polymesh because the objects are not broken into separate individual surfaces.
Polymesh Solids export Revit elements as individual surfaces with each one containing its own material identification. Although this makes life easier for material assignment inside 3ds Max it will slow down render times.
Exporting to FBX: FBX is a newer file format developed by Autodesk for improving interoperability between Revit and 3ds Max. There are no options within Revit for how the data is exported so you are limited in terms of any customisation.
To export to FBX, make sure the camera or 3D view is active and go to Revit Icon > Export > FBX.
Max import process
Tim Power, owner of Virtual Resolution, walks us through the import process into 3ds Max.
Generally this process is very simple and there are a number of file types that can be used when importing Revit files (DWG, ACIS, FBX). Each type of file has its own benefits and drawbacks; file size, number of objects, number of polygons, editability, etc).
In most cases when we receive well-built models, we will use the native Autodesk FBX format. If the quality of the Revit model is very good then this is definitely our preferred option and there is much less ‘fixing’ work to do in 3ds Max afterwards. It can also reduce render times as well.
Importing files into 3ds Max: File> References> File Link Manager. Choose the relevant file to import and click OK.
A dialog box will pop up with some import options. Change the options as detailed below:
FBX file link
Preset: Autodesk Revit FBX – Change Combine by Revit family type — This will group the objects into basic layers/components (ie, walls/lights etc)
NOTE: Bind FBX to remove the link if required.
Once the model is within your scene there will generally be a few items that have not come over exactly how you would like them.
3ds Max gives you that little bit more control of objects at the polygon level along with the ability to create more organic forms and detailed assets. It has the ability to drill down into material creation and lighting to get real world results, as well as having access to physically correct sun/sky models and Gamma control for increased realism.
The main items that have noticeably changed within this particular scene included using 3ds Max’s advanced editing tools to refine the recessed lights, mullions and staircase, we replaced the cameras and used camera correction to improve the verticals. We also replaced the default materials within the scene to Vray materials and created a new lighting setup.
Conclusion
Through our experience with BIM we have found that you only get out what you put in.
It is important that the user who is developing the Revit model has a good grasp on BIM model development, content creation and model management. Lack of experience in these three areas will cause problems with any Revit render and any subsequent exports to 3ds Max.
Rendering in Revit is getting better but is by no means a substitute for professional rendering. Fully understanding exposure, reflection, refraction, depth of field etc, is vital in achieving a quality result.
Hardware limitations can also halt productivity on a workstation. As a result it could take a Revit user much longer to produce an image that is of a lower quality than those produced by professional visualisers.
When creating a CG image produced both within Revit and within 3ds Max, understanding the limitations and stages involved when creating the image can help create better results. Also, in circumstances when a model is designed from the outset to pass over to a visualiation studio, it can help reduce costs, production and rendering times and help facilitate the communication of design ideas between designer and visualiser.
virtualresolution.co.uk
revitfactory.com


