In 2015, Autodesk released Project Fractal to investigate generative design in AEC. It has now evolved into Project Refinery and Lawrence Hooker, technical consultant, Excitech explores the Beta
Generative design is, in essence, a collaborative effort between human beings and machines. The process takes perfect advantage of the merits of each contributor; computers excelling at working with enormous datasets and algorithms and humans being really good at selecting rational, realistic designs, and evolving these designs into a real project.
When creating project schemes, the human designer only has time to generate a few design alternatives. Typically this is a very time-consuming process and hence expensive. The ideal design may be missed or, not even explored due to time and cost restrictions. This is a perfect application of generative design. The human can then select the best designs and refine these further if required.
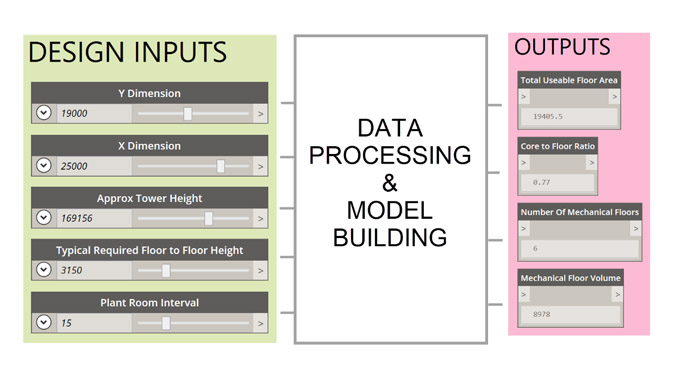
The process starts with the designer defining a number of inputs that are important to a particular design. For example, if we are designing a high-rise conceptual building, we may want to set a series of inputs such as total required floor area, maximum height, the maximum footprint, façade area, and so on. The generative design software can then use these inputs and iteratively generate numerous outputs using variations of each input. The software can potentially generate hundreds or thousands of design alternatives. Many of these will be inappropriate but some will likely fall within the parameters of a good design.
The key part of the process is ranking the large amount of results into a few possibilities that the designer may want to evaluate further. In order for the software to rank the designs, the designer will need to define a series of ideal outcomes. Using the example of the high-rise building design, the outputs may contain parameters such as cost of construction, height to width ratio, core to floor ratio and façade area. This is achieved with the use of specialised algorithms.
Dynamo and Revit
Project Refinery relies heavily on the use of Dynamo to define inputs, outputs, perform calculations and generate any model geometry that may be required. Dynamo is a visual programming tool that is included with products such as Revit, Civil 3D and Advance Steel. It aims to unleash the power of programming to the masses making use of its visual programming interface, which is far easier to learn and quicker to implement than traditional coding.
Access to specific Autodesk application tools and commands are provided within the Dynamo interface, as well as a raft of tools to create custom geometry, manipulate and sort data and define custom logic. You can also use Iron Python and C# to extend the power of Dynamo further and also link data and geometry to other software applications.
In figure 1 you can see a very simple Dynamo program to create a range of Revit levels from 0 to 12,000mm with a floor to floor height of 3,000mm. The Level name is generated by concatenating a string “Level “with a list of numbers from 1 to the count (i.e. how many items occur in the list).
A typical Dynamo script for Project Refinery will have a series of sliders with ranges set to define inputs. The bulk of the Dynamo script will then build geometry and data based on these inputs. The geometry will initially be defined in Dynamo but can also be generated in Revit. For example, a basic tower massing model can be built with Dynamo geometry and then Revit floors, walls, structural columns and curtain walls could be added to build a basic model. A series of Dynamo watch windows are created to show various outputs.
In our example of a high-rise massing study the outputs may be data such as Core to Floor ratio, Floor area and material volumes, as seen in figure 2. These watch windows are used by Project Refinery to rank the models.
Project Refinery
Project Refinery can be run directly from the interface of Dynamo for Revit or Dynamo Sandbox, Dynamo now having a menu dedicated to Generative Design. Once inside the menu you can export your project for generative design. You are prompted to write a simple description for your project and add an image.
The Dynamo graph is evaluated within the Export for Generative Design dialog and, if no errors are found, is ready to go! Typical errors will be if the outputs cannot be passed, i.e. the output is not an Integer or a number or the Dynamo Graph has not been saved.
The next stage is to create a study on one of your published designs. The image and description are helpful and aid you when selecting a particular study.
Once a study is chosen then a solver must be selected from a list, as shown below, to determine how Project Refinery generates and presents the models. Inputs are then selected to drive the design, typically these will be sliders that have been defined within Dynamo. For example, the inputs for a high-rise tower may be tower height, floor to floor level, core to floor ratio, mechanical levels and structure type. Some outputs will typically need to be constrained, for example the slenderness factor may not want to exceed 1:10 and the core to floor ratio will not want to be exceeded to keep efficiency of the tower design. The next stage is to control the number of generations that Refinery will produce; the more generations you create, the slower the process.

For example, if you are using the cross-product method with a large number of inputs the number of models generated can multiply quickly. If you are using a random generation then you can directly enter the number of models that you want to create.
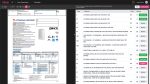
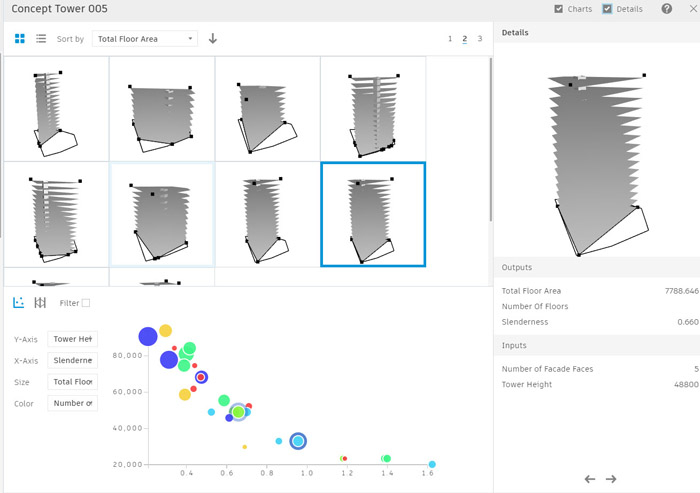
Once the models are generated you can then use a variety of methods to visualise the results and rank these by certain criteria. figure 3 shows the design grid view with the models ranked by total floor area, the scatterplot graph below is plotting the tower height vs the slenderness ratio. The size and colour of the circle can also be assigned to various parameters.
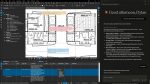
Another method is to visualise the data by using a parallel coordinate graph. figure 4 shows all the inputs and then the values are plotted along the graph, the line is highlighted in blue when you move your cursor over the image in the grid view.
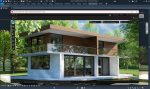
When a solution has been selected you can open this in Dynamo which will then build the relevant model in your design application – in the case of the high-rise tower, Autodesk Revit.

Conclusion
Project Refinery currently runs on the user’s local computer and uses some interesting technology to solve multiple solutions with a good amount of speed. For example., I generated 200 random versions of a tower massing study in just under 18 seconds! I would imagine in the future that the services will be running on the cloud to further increase speed. Autodesk is also releasing a number of toolkits that can be used within Dynamo to aid generative design processes. One challenge is the optimisation of space within a building or applications such as housing site layouts. These are very high on the wish list for generative design and are currently quite challenging issues to solve.
Generative design will, year on year, become more and more important in all sorts of industry sectors. We have already seen real world examples of it being used within the manufacturing sector to refine, optimise and create stronger, lighter products. The AEC industry will surely have huge gains when reducing materials, making better use of space and, of course, increasing efficiency.
If you want to use generative design processes in your next project, then you will need to make sure that your Dynamo skills are polished and ready to go!
■ autodesk.com/campaigns/refinery-beta
If you enjoyed this article, subscribe to our email newsletter or print / PDF magazine for FREE