There are a whole host of approaches to lighting indoor spaces, which all have relative strengths and weaknesses. In the first part of a four-part comparison of these interior lighting methods, Darren Brooker walks us through lighting in conjunction with radiosity rendering.
There are many approaches to lighting an indoor space in CG and if the results are aesthetically pleasing then the means by which the output was produced is largely irrelevant. However, given that the differences in the capabilities of the different approaches are reflected in differing render times; knowing your way around these different methods can be invaluable in a production environment.
” The process of modelling light propagation involves dividing the original surfaces into a mesh. The radiosity algorithm then calculates the amount of light distributed from each mesh element to every other mesh element. “
Within this series of articles, weÝll look at a range of approaches to lighting, starting here with radiosity rendering, which can produce stunningly realistic results. However, the flipside of this realism is the time that these renders require to calculate the radiosity solution. Furthermore, if you have moving objects within your scene, this makes this technique fairly unusable, as the radiosity solution is constantly changing and therefore needs to be calculated for every frame. There is a workaround for using HDR maps to relight the moving elements within this type of scenario, but youÝll have to wait until next month for this, when we move onto global illumination with mental ray and HDR lighting.
Positives:
1. Solution only needs calculating once for multiple cameras.
2. Simple to set up, once the workflow is understood.
3. Can provide beautifully realistic warm and soft results.
Negatives:
1. Does not address all global illumination elements (caustics are only dealt with by mental ray).
2. Solution needs recalculating if objects moving in scene.
3. Slow to calculate.
Tips & Tricks
– Always check your system units.
– Use photometric lights to represent real-world fixtures.
– Use the Exposure Control to account for high dynamic ranges.
– Turn on Reflectance & Transmittance Information in
Preferences.
– Design your materials carefully, in line with real-world materials.
– Work with white materials initially to define your render settings.
– Introduce curved objects to help define your render settings.
Radiosity has its roots in thermal engineering research, before its methods for simulating radiative heat transfer between surfaces was reworked by computer graphics researchers, twenty years later, in the early 1980s. This process of modelling light propagation involves dividing the original surfaces into a mesh of small elements. The radiosity algorithm calculates the amount of light distributed from each mesh element to every other mesh element. Nonetheless, radiosity does not in fact address all global illumination effects, but as it excels at rendering diffuse inter-reflections and raytracing excels at rendering specular reflections, the two complement each other perfectly. After the radiosity solution has been calculated, a two-dimensional view of it is rendered, with raytracing adding the effects that it is particularly suited to providing: raytraced shadows, and materials that feature raytraced reflections and refractions. The final render thus combines both of these techniques in an image that appears more realistic than either technique alone could manage.
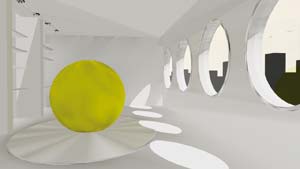
In order to understand the workflow for working with radiosity in 3ds Max, it makes sense to take a look at how radiosity is processed by the application, which is a three-stage process. Open the 01Radiosity.max file and within the Advanced Lighting tab of the Render Scene dialog, select the Radiosity plug-in from the drop-down. Near the top of the options appearing in this panel, youÝll now see the Initial Quality setting, set to 85%. This is the first stage of the refinement process that involves the distribution of diffuse lighting in the scene.

Figure 1 — After the initial run, ‘Exposure Control’ makes the initial exposure looks correct, but there are still noise and geometry issues.

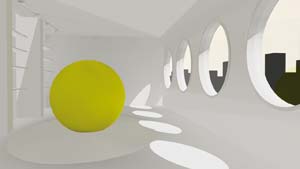
Figure 2 — In the Refine Iterations stage light is ‘regathered’ at every surface element and there is a definite improvement in quality, though some geometry issues are still apparent.

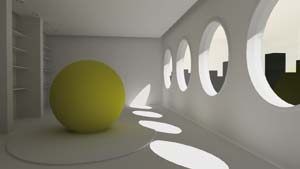
Figure 3 — Final production quality rendering is achieved in the third, Pixel Regathering, stage.
Between each iteration, the radiosity engine measures the amount of noise that was computed between surfaces, with the contribution to the sceneÝs average brightness decreasing logarithmically between iterations. An Initial Quality setting of 100% would provide a 100% accurate energy distribution, but this would not be 100% in terms of the visual quality of the solution. A setting of 80 – 85% is usually sufficient for good results, so leave this setting as it is and hit Render. You should get a really blown-out result, which is because you need to use the Exposure Control to compensate for the dynamic range of radiosity rendering. Hit the Setup button further down the same rollout and choose Logarithmic Exposure Control.
If you render now, youÝll see that the exposure looks correct, but that there are noise and geometry issues, as you can see in figure 01. This is dealt with by the second refinement stage ± Refine Iterations. Due to the random nature of the sampling during the previous Initial Quality stage, some of the smaller surfaces or mesh elements in the scene might miss being hit by a sufficient amount of rays. These small surfaces remain dark, and result in the appearance of dark spots. To alleviate these artefacts, the Refine Iterations stage Ùregathers lightÝ at every surface element. Change the Refine Iterations (All Objects) setting to 2 and set the Indirect and Direct Light Filtering to 3 and 2 respectively. You should see that your render now takes next to no time to complete and thereÝs a definite improvement in quality, though some geometry issues are still apparent, as you can see in figure 02.
To deal with these topology-related artefacts, which often appear as shadows or light leaks, a third refinement stage, known as Pixel Regathering, occurs at the time of image rendering. This involves a final regather process for each pixel of the image, which can add a fair amount of time to the rendering of a final image. To see this, turn on Render Direct Illumination in the Rendering Parameters rollout and render again. YouÝll see the difference this makes to your render time, but also your final rendering. There are still artefacts, in the form of light leaks, but you should see that this solution is almost there. If you want to look at the final render settings for this scene, open 01RadiosityFinished.max, where you can look through these rollouts to see what else is required to get to a final production quality rendering standard, as shown in figure 03.
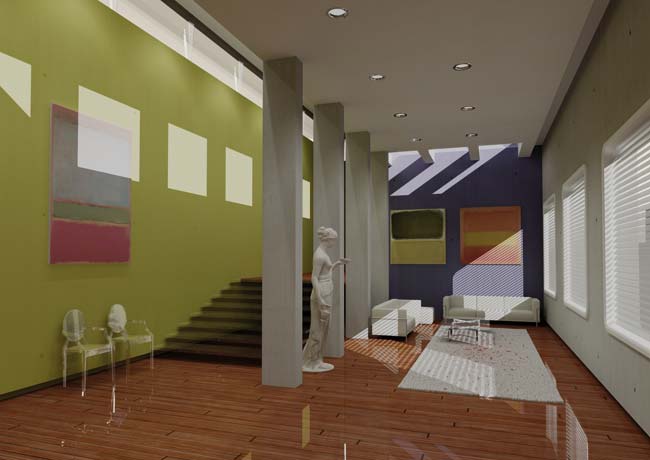
Now that you understand what determines the quality (and render times) of a radiosity render, you should open the 01RadiosityExample.max file, which is all set up to render at final render quality, just like our main image. If you look at the render settings for this scene, you will see that they are identical to the final quality settings for the previous scene file. However, this scene is more complex and this is the scene that we will be relighting each month using different methods in order to compare render times, output quality and any particular strengths and weaknesses.
Things to note are that the interior lighting uses photometric lights, which use a pre-defined photometric web that is a 3D representation of the light distribution of a light source. Many lighting manufacturers provide web files that model their products, so particularly if you are visualising a space that is to feature specific light fittings, this is something you should take advantage of.
” Many lighting manufacturers provide web files that model their products, so particularly if you are visualising a space that is to feature specific light fittings, this is something you should take advantage of. “
A related thing is to ensure your sceneÝs units are correctly defined. As radiosity works with physical lighting, so the lighting simulations obey its physical laws. You can imagine that a three-metre high space will look quite different to a three kilometre high space when lit by the same light fittings. The Units Setup dialog should be used to ensure that this is being dealt with correctly. The System Unit Setup is the most important component of this dialog, as the Display Unit is just a tool that lets you customise how units are displayed in the UI. Setting up units correctly is particularly important if you are importing geometry from another application.
Visit www.stinkypops.co.uk/aecPt01.html to download a zipped archive of all the scene files and textures that you will need to complete this tutorial. Unzip them to your chosen location on your hard drive.
Another thing to ensure is that you are designing your materials in line with their real-world equivalents. The best way to do this is to make sure that you have the Reflectance & Transmittance Information turned on in the Preferences. This allows you to see how reflective your materials are within the Material Editor. For example, a white paint material should only have a reflectance of about 80%, so by turning on this feature, you can ensure that your materials behave as their real-world equivalents would.
All of these tips will equip you well for rendering with both radiosity and mental ray, as well as with HDR lighting, so these fundamentals are good to remember early on. Next month weÝll continue with global illumination, this time using 3ds MaxÝs second renderer ± mental ray ± and weÝll start to take a look at rendering out floating-point HDR maps in order to relight additional scene elements.
To read the second part of this tutorial, click here
For the third part of this tutorial, click here
Darren Brooker is a BAFTA award-winning lighting artist who has worked at many top UK studios. He works for Autodesk as a product specialist. His book, Essential CG Lighting Techniques with 3ds max, is published by Focal Press


